1. Introduction
So we’re back, ready to run through an additional step into our Verisure Wireless alarm journey. This post is the second chapter of my Verisure story where we’ll learn how to extract and dig into firmwares. Getting firmware out of the memory will actually help us to grab various AES keys, a required step to decrypt both radio and ethernet communications, but also authenticating against the local console using USB connector (this will be described in part 3).
The reader can found the first part of this journey at the following location, where we briefly introduced the Verisure Wireless equipments and shown how to demodulate RF messages using GNU Radio framework and the HackRF One SDR platform.
Our initial investigations aimed to get a clear view on the alarm design and more especially, its security level. We learned from part 1 that radio communication is encrypted using a strong algorithm (AES-128). However, even the strongest cryptographic algorithm can be broken if weaknesses exist in the software and particularly in the keys management. We’ve been reassured to see that Verisure made a very good choice in their design. Additionally, keep in mind throughout this article that our work was performed inside a lab, and successfully achieved because we got physical access to the alarm. We were indeed able to read and/or modify firmware and memory which is not possible in a live environment, at least not without triggering multiple anti-sabotage sensors.
2. Crypto key management
So yes, as we saw in part 1 section 5, RF communication is encrypted using AES-128 CBC mode.
During our investigation, we found Keys for two purposes, respectively named by Verisure as:
- Crypt Keys: used to encrypt payload frames.
- Hash keys: used to generate digital signatures. During radio communication, a digital signature is appended to each message.
We’ve also observed two type of Keys ownership:
- Session keys: A key pair (crypt/hash) shared by all devices to communicate and sign messages, randomly generated by the Vbox once in a while (e.g: firmware upgrade)
- Personal keys: A unique key pair (crypt/hash) hardcoded in each device, known by the Vbox and essentially used to share the session keys upon device boot (or resynchronization with the Vbox).
2.1. Session key exchange
The following picture illustrates how are the session keys shared between a device and the Vbox, where Keyx represents the personal crypt key of device x.
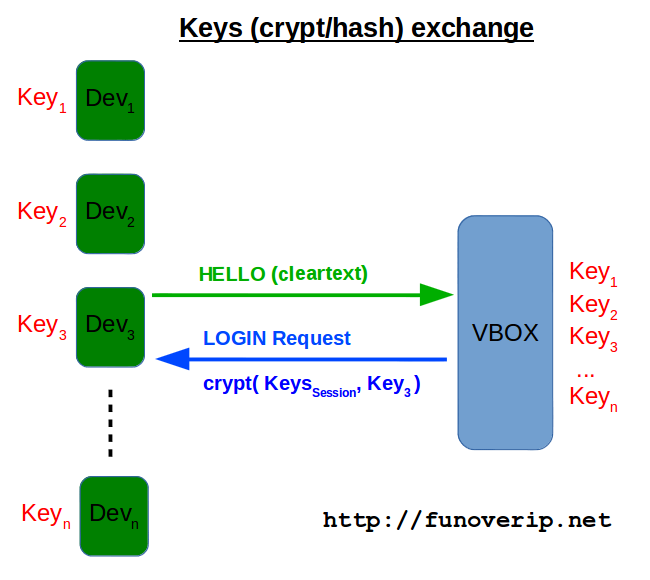
So, the session keys (crypt/hash) are sent over the air, and protected (encrypted) by personal crypt keys. Getting personal keys would then give us session keys. But wait.. if personal keys are hardcoded into the devices, how does the Vbox know about them? Indeed, a very interesting point is to understand how the Vbox get knowledge of the personal keys. Simple question:
- Would the personal keys be derived from a known component such as device ID?
- If it is the case, would an algorithm be present somewhere inside the Vbox?
Unfortunately (oops, I meant “hopefully” :) ), there is no such algorithm inside the firmwares. Personal keys are actually pushed into the Vbox by Verisure over the Internet (or 3G). We don’t know if those keys are totally random or the result of an algorithm but in any case, creation and/or storage of the personal keys are managed by Verisure infrastructure, which is from a security point of view, a very good point!
2.2. How to get those keys then?
Now that we know a little bit more about keys management, how do we get the crypto keys and finally recover clear-text messages ? Because we have physical access to the equipment, there are at least two ways to achieve this:
- Extracting the personal keys of a device from its memory (hardcoded at a static address), rebooting the device (unplug-replug the battery) and then decrypting the LOGIN request using the corresponding personal key. This will give us the session keys that we are looking for.
- Getting access to the Vbox console (through the USB port) and then to request all keys using the polite way. This will be further explained in part 3.
3. Getting firmwares and personal crypto keys
3.1. CC1110 based devices (Magnet, Keypad, …)
Extracting firmware of a CC111x-based device is a peace of cake, thanks to GoodFET JTAG adapter. An example is given using a Magnet contact door. Below are the identified test-points of the PCB:

It is now only a matter of wiring the test points with the GoodFET adapter, using the following assignment:
MAGNET PIN           GOODFET PIN
==========           ===========
GROUND ----------------- 9 (GND)
RESET_N ---------------- 5 (TMS)
DEBUG_CLOCK (P2_2) ----- 7 (TCK)
DEBUG_DATA (P2_1) ------ 1 (TDO)
DC --------------------- 2 (VCC)
goodfet.cc should now recognize the device as follow:
# goodfet.cc info
SmartRF not found for chip 0x0103.
Ident   cc1110/r0103/ps0x0400
Freq         0.000 MHz
RSSI    00
And we can dump the firmware as follow:
# goodfet.cc dumpcode /tmp/code.hex
SmartRF not found for chip 0x0103.
Dumping code from 0000 to ffff as /tmp/code.hex.
Dumped 0000.
Dumped 0100.
Dumped 0200.
Dumped 0300.
Dumped 0400
.....
Dumped fd00.
Dumped fe00.
Dumped ff00.
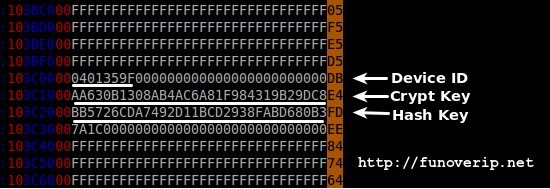
Finally, device ID, Crypt Key and Hash Key can be recovered from the following static location of the dumped image file (far below the code section):
3.2. ARM based devices (VBox, Camera)
The most interesting part for us is of course the main component of the system, a.k.a. the Vbox. The Vbox manages both communications with sensor devices and Verisure infrastructure for monitoring and configuration purposes. Indeed, a Verisure alarm is configured by end-users from a publicly exposed web application called Mypage, hosted by Verisure. Every modifications of the configuration through MyPage are then pushed on the Vbox by Verisure.
Lets get a first look on the PCB (click to enlarge):

3.2.1 Identifying the JTAG pins
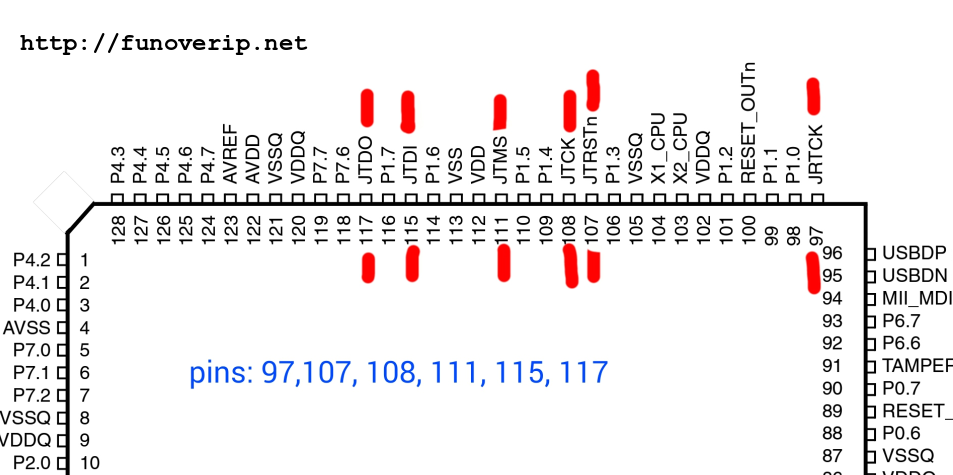
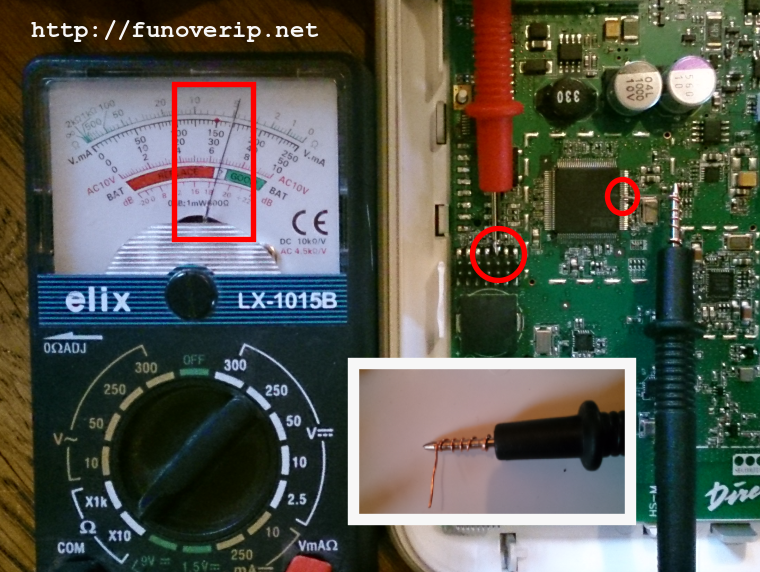
The Vbox is orchestrated by an ARM STR91X chipset. What appears to be a JTAG connector on the bottom of the PCB (2×7 pins) was identified and confirmed using a cheap analog multimeter in resistance testing mode. For this, we referred to the datasheet and identified the JTAG pins of the chipset itself:
And probed each pin of the PCB:
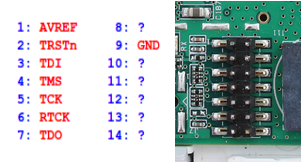
Finally, the corresponding JTAG pins were found at the following positions:
3.2.2. OpenOCD and GDB to the rescue
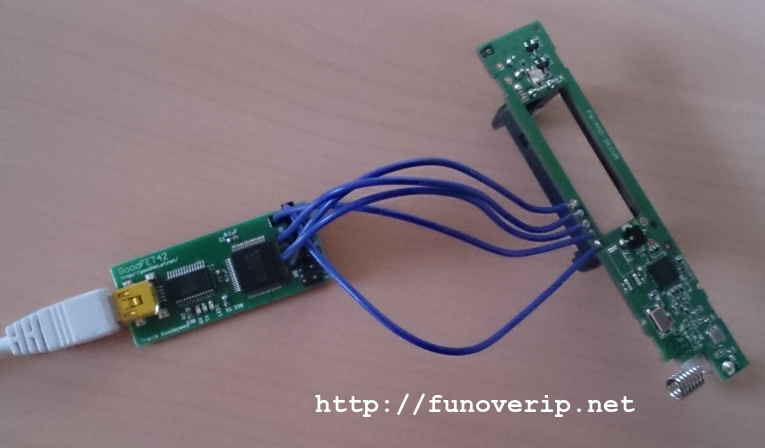
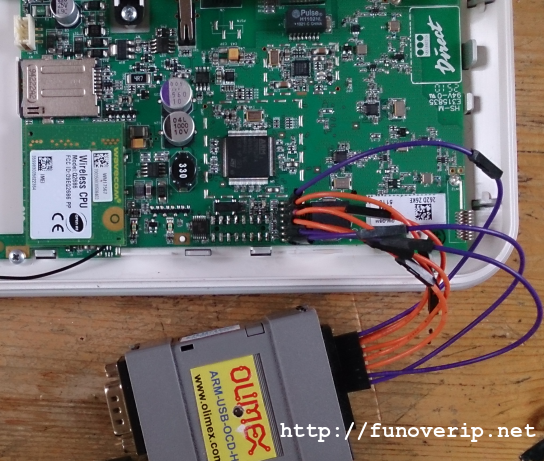
The remaining step now is to access the chip memory and/or CPU. For this, we’ve made usage of a fantastic tool called OpenOCD (Open On-chip Debugger) as well as an Olimex ARM-USB-OCD-H JTAG adapter. A last word about the JTAG pins of the PCB: pins have a pitch of 2mm, not 2.54mm (as commonly used). Finding the right connector on the market is a painful exercise. We then took the lazy approach to solder wires directly on the PCB. Another cheap technique is to use general jumper cables (e.g. GPIO Arduino cables) and to reduce the size of the connectors manually, as we did in the following screenshot.
Once successfully connected, OpenOCD delivers full access to the chip:
$ openocd -f openocd.cfg
Open On-Chip Debugger 0.9.0-dev-00131-gbd0409a (2014-08-30-07:47)
Licensed under GNU GPL v2
For bug reports, read
 http://openocd.sourceforge.net/doc/doxygen/bugs.html
adapter speed: 16 kHz
adapter_nsrst_delay: 100
Error: session's transport is not selected.
Info : session transport was not selected, defaulting to JTAG
jtag_ntrst_delay: 100
trst_and_srst separate srst_gates_jtag trst_push_pull srst_open_drain connect_deassert_srst
Warn : str912.flash: nonstandard IR mask
Warn : str912.bs: nonstandard IR mask
Info : clock speed 16 kHz
Info : JTAG tap: str912.flash tap/device found: 0x04570041 (mfg: 0x020, part: 0x4570, ver: 0x0)
Info : JTAG tap: str912.cpu tap/device found: 0x25966041 (mfg: 0x020, part: 0x5966, ver: 0x2)
Info : JTAG tap: str912.bs tap/device found: 0x2457f041 (mfg: 0x020, part: 0x457f, ver: 0x2)
Info : Embedded ICE version 6
Info : str912.cpu: hardware has 2 breakpoint/watchpoint units
Here is the OpenOCD configuration file. The only changes we have made were to increase the adapter clock and the ARM watchdog timer (useful inside GDB during breakpoints):
source [find interface/ftdi/olimex-arm-usb-ocd-h.cfg]
source [find str912.cfg]

gdb_memory_map disable
reset_config trst_only

init
adapter_khz 3000
halt
# increasing watchdog timer
mww 0x5c00b008 0x0000ffff

#dump_image /tmp/vbox_0x0_0x100000.img 0x0 0x100000

#resuming CPU
resume
3.2.3. Getting all keys in one shot
Remember that the VBOX component holds personal keys of the whole equipment (all registered RF devices). Why not extracting all these keys in one operation ?
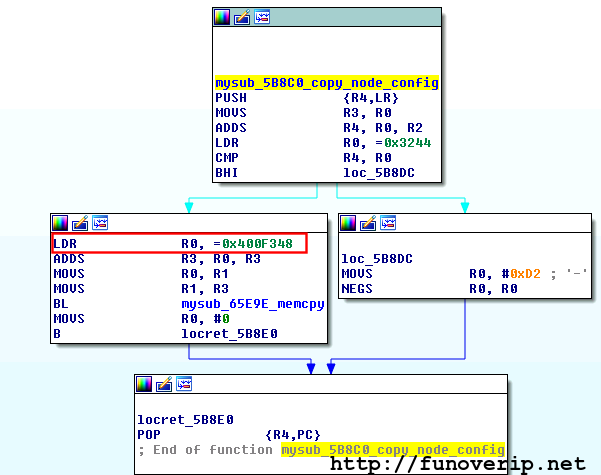
The location where keys are stored isn’t static in memory but depends of the firmware version. Brief demonstration showing function copy_node_config() from two different firmware versions. In red, the base-address where nodes are defined.
Version 1:
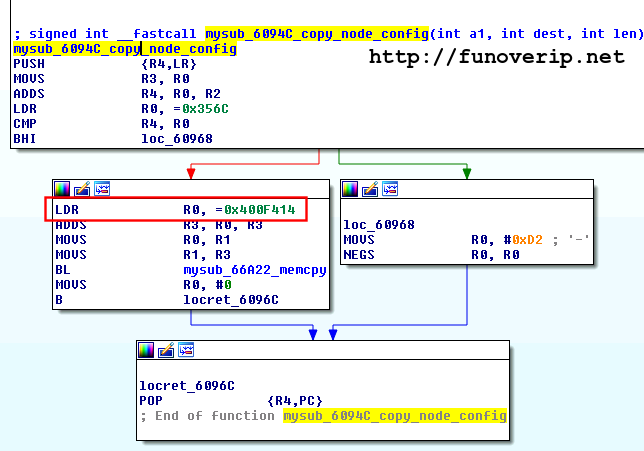
Version 2:![copy-node-config1]()
In any case, thanks to the datasheet, we know were the RAM segment is located and how to write a simple parser in python :-)
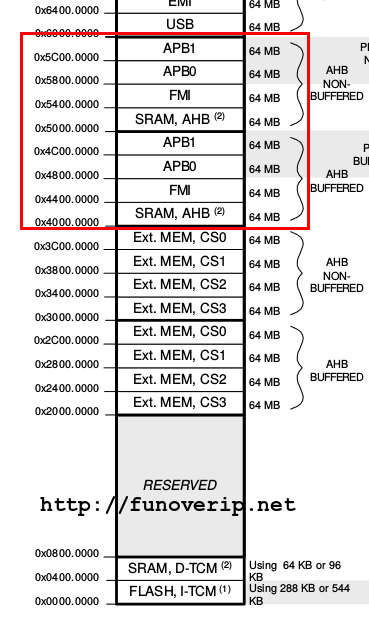 From an OpenOCD telnet session, dumping this portion of memory is as straight forward than pausing the CPU and dumping memory:
halt
dump_image /tmp/vbox_ram_0x50000000_0x54000000 0x50000000_0x04000000
resume
Our memory parser will then drive from here as soon as we give it the name or ID of the Vbox (source code can be found on Github repository):
$ ./vbox-mem-parser.py -h
usage: vbox-mem-parser.py [-h] [-n NODENAME] [-i NODEID] -f FILE

optional arguments:
  -h, --help            show this help message and exit
  -n NODENAME, --nodename NODENAME
                        Vbox node Name (ex: '262D 3BF9')
  -i NODEID, --nodeid NODEID
                        Vbox node ID (ex: '0100d37c')
  -f FILE, --file FILE  Memory dump file

./vbox-mem-parser.py -n '262E 9BV7' -f /tmp/vbox_ram_0x50000000_0x54000000
[*] Provided arguments:
    Dumpfile     : tmp/vbox_0x50000000_0x54000000
    Dumpfile size: 98304 bytes
    Vbox name    : 262E 9BV7
    Vbox id      : 0100c3a7
[*] Searching memory...
    Potential device list was found.. => False positive
    Potential device list was found.. => False positive
    Potential device list was found.. => False positive
    Potential device list was found.. => False positive
    Potential device list was found.. => False positive
    Potential device list was found.. => False positive
    Potential device list was found.. => Confirmed!
[*] Extracting device list and crypto keys
    Device : 0100c3a7 (VBOX!)
    crypt: be 0e 6a db b0 d4 dd ac 1b 88 67 9f 51 af 85 ed
    hash : 1d 07 1e ad 70 58 65 aa 81 b8 89 42 d1 89 71 2a
    Device : 0600a2d8
    crypt: cd 85 12 20 ec 1b 52 c8 11 95 06 11 58 1a 1a 4d
    hash : 28 25 ab 99 74 7b 8c 1b 57 03 85 c4 ee 1d 76 cf
    Device : 050232db
    crypt: df 51 c7 c3 08 d4 88 39 3b c0 05 36 b9 2d 3b a4
    hash : 51 81 d0 8e d4 43 d0 07 f0 23 2b 77 0c 16 5c e6
    Device : 050232d1
    crypt: de 66 43 a6 50 c7 6d a4 bc 80 05 76 eb b0 0f 2b
    hash : 9f b6 1a c3 6b 15 dd c4 1a 2b b3 18 fc b1 fc b6
    Device : 0402952d
    crypt: 2d 13 57 77 e5 dd 24 d3 a0 3c 39 b7 3d c7 fd 96
    hash : 44 9e 65 49 f7 dc 55 3b a7 3c c4 23 ce c3 45 ec
    Device : 04016cb1
    crypt: da f6 8a a5 0a 98 6b eb e2 74 e1 5d b5 26 5c f3
    hash : a9 c6 ef 5b 59 9f ea 07 a8 b1 a3 5d 05 f1 a2 80
    Device : 0301fa45
    crypt: 15 63 76 3e b2 00 24 10 b2 33 47 b7 11 cc 88 2d
    hash : a5 b1 3b 1d 0c ab ef 5e ba 06 d6 a7 b9 a3 2e 13
[*] Done
4. Getting the session keys
So far, all we got are the personal keys of the devices which is still insufficient to decrypt the RF messages. A last step still need to be achieved in order to decrypt RF traffic:
- Rebooting a device
- Capturing and decrypting the LOGIN request (sent by the VBOX to the device after the HELLO message), using the personal encryption key of that device.
By reusing the GNU Radio script provided in part 1 of this story, the login request can be captured from the air during device boot. An example is given using a “Magnet” device (removing and replugging the battery will initiate the HELLO message and then the LOGIN request).
- At line14 the device identified as “04016cb1” send a HELLO message.
- At line 15 the Vbox replies with a LOGIN request containing the session key pair as well.
./verisure_rx.py
linux; GNU C++ version 4.8.2; Boost_105400; UHD_003.007.002-0-unknown

Using Volk machine: sse4_2_32_orc
gr-osmosdr v0.1.3-1-g4bb2fa4e (0.1.4git) gnuradio 3.7.5git-214-g94562c93
built-in source types: file fcd rtl rtl_tcp uhd hackrf rfspace
Using HackRF One with firmware 2014.08.1
[17:03:59.512431] Starting flowgraph
[17:03:59.538772] Frequency tuned to: 869037.22 KHz
[17:04:01.600355] 0f 14 00 0100c3a7 ffffffff 81 00 00 00 00
[17:04:01.600467] 0f 14 04 0100c3a7 ffffffff 81 00 0a 00 00
[17:04:01.600528] 0f 14 08 0100c3a7 ffffffff 81 00 14 00 00
[17:04:01.600596] 0f 14 0c 0100c3a7 ffffffff 81 00 1e 00 00
[17:04:21.499822] 13 10 04 04016cb1 ffffffff 89 3e 17 6e 7a 00 02 7a 12
[17:04:21.499970] 3a 0c f3 0100c3a7 04016cb1 80 63 7d 35 aa 35 b1 b2 a7 5b b1 ad 30 49 52 66 84 04 c7 04 35 04 b5 26 2f f4 98 5d 3a 55 a7 78 d3 ae 9f 58 bc da b7 19 16 4c de 78 6f d0 fe a4
[17:04:21.500047] 1a 0c c7 04016cb1 0100c3a7 9b 01 00 be b7 cc 73 b1 0b 3f 9c 15 61 24 00 49
[17:04:21.800581] 1a 0c cb 04016cb1 0100c3a7 ed af 9b 8c 5c eb e6 7a b8 06 c1 d1 9b 87 28 e9
[17:04:21.800863] 1a 0c d7 0100c3a7 04016cb1 c5 b9 fa 46 8b c9 34 a2 6f d5 ba 8a cf 15 a6 08
[17:04:21.901169] 1a 0c cf 04016cb1 0100c3a7 d5 1f a8 91 61 47 69 84 44 53 08 fb 5e 1b b1 7a
[17:04:21.901293] 1a 0c db 0100c3a7 04016cb1 fe 62 bf bd 81 94 42 dc d9 01 fe 22 ec a2 70 70
[17:04:21.901357] 0b 00 10 04016cb1 0100c3a7 82
[17:04:22.602694] 0f 14 1c 0100c3a7 ffffffff 81 52 08 00 00
[17:04:27.526648] Exiting
It is time to decrypt the payload of the LOGIN payload, using the personal key of the right device (04016cb1)
$ ./tobin.pl "80 63 7d 35 aa 35 b1 b2 a7 5b b1 ad 30 49 52 66 84 04 c7 04 35 04 b5 26 2f f4 98 5d 3a 55 a7 78 d3 ae 9f 58 bc da b7 19 16 4c de 78 6f d0 fe a4" \
   | openssl enc -aes128 -d -K daf68aa50a986bebe274e15db5265cf3 -iv 00000000000000000000000000000000 \
   | hexdump -C
00000000 00 05 8d 1a bb d3 08 51 24 d0 92 ae cc fa 78 02 |.......Q$.....x.|
00000010 c9 fe 0d 89 b6 f6 24 39 a9 8b db 71 da 2b b2 5e |......$9...q.+.^|
00000020 a5 81 92 68 33 3c 00 19 20 eb d1 91 5a          |...h3<.. ...Z|
0000002d
- The Crypt Session key starts at 3rd bytes (16bytes length) of the decrypted payload. In this case, the crypt key is 1abbd3085124d092aeccfa7802c9fe0d. This is the key expected by “verisure_rx.py -k <key>” GNU Radio script (see part 1, section 5)
- The Hash Session key follows the crypt key. In this case, the hash key is 89b6f62439a98bdb71da2bb25ea58192
5. Final notes
In this article, we have observed:
- How to extract firmwares from the devices
- Multiple ways to recover personal keys from the devices
- How to get the session keys
We are now able to decrypt the radio communications between sensors and the Vbox using the GNU Radio script. We didn’t cover the ethernet communication between the Vbox and the Verisure servers but briefly, AES is also in use on that side of the Vbox. On this channel, the AES key is the personal key of the Vbox. The Initialization Vector (IV) is null.
New material has been added to our Github repository: https://github.com/funoverip/verisure-alarm
Hope you enjoyed.
Note: There is a rating embedded within this post, please visit this post to rate it.© 2014, Fun Over IP. All rights reserved.


